SSO Implementation
SSO Implementation
(Single Sign On) in Daiana virtual machines
Introduction
This documentation contains the step-by-step guide to correctly implement login via Supabase SSO.
Reference Guide
https://calvincchan.com/blog/self-hosted-supabase-enable-sso
Prerequisites:
- Credentials of the virtual machine we will access
- Self-hosted Supabase
Enable SAML in supabase:
- In a console we must create a private_key which will serve as a key for our SSO in supabase, with the following command a file named : private_key will be created in the directory where we are in the console:
openssl genpkey -algorithm rsa -outform DER -out private_key.der

- In the same directory where the file was created we put the following command, which will create a .txt file containing the private_key key:
openssl base64 -in private_key.der -out private_key_base64.txt

- Now from our portainer we go to stacks>Supabase>Editor . In our editor we look for the auth part where the container_name is : supabase-auth and add these two variables :
GOTRUE_SAML_ENABLED: “true”
GOTRUE_SAML_PRIVATE_KEY: (key from txt file)

Expose SAML endpoints in Kong.yml
In this step we must enter the virtual machine and in the Kong.yml and nginx.config file add two configuration blocks so that our supabase has the correct endpoints to direct users. In this case to modify the files from within the console I recommend using “Remote – SSH”, a Visual studio extension that allows entering the virtual machine and exploring the files.

Once we are inside the vm we must look for the Kong.yaml file and add this configuration at the end of the previously added configurations:
name: auth-v1-open-sso-acs
url: “http://auth:9999/sso/saml/acs”
routes:
- name: auth-v1-open-sso-acs
strip_path: true
paths:
- /auth/v1/sso/saml/acs
- /sso/saml/acs plugins:
- name: cors
- name: auth-v1-open-sso-metadata
url: “http://auth:9999/sso/saml/metadata”
routes:
- name: auth-v1-open-sso-metadata
strip_path: true
paths:
- /auth/v1/sso/saml/metadata
plugins:
- name: cors
Usage Guide : DAIANA Training Console
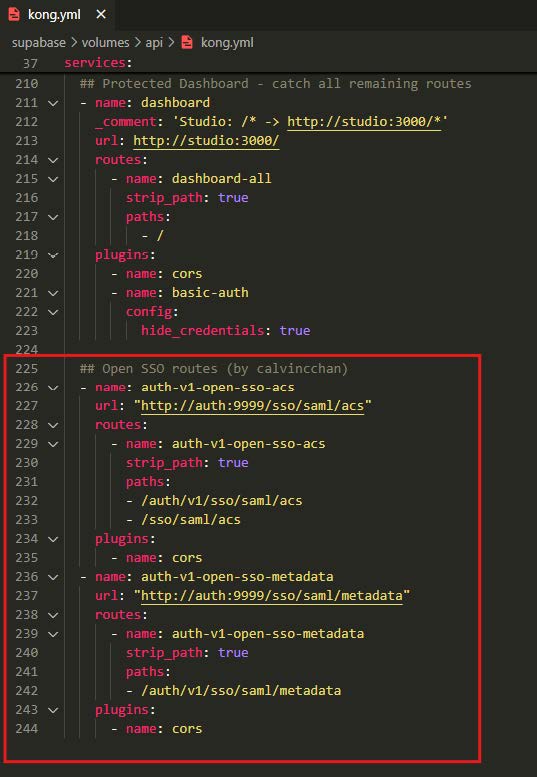
(Respect the indentation for correct functioning, you can copy the code from the reference guide link).
We must do the same in the nginx.config file adding this :
location ~ ^/sso/(.*)$ {
proxy_set_header Host $host;
proxy_pass http://kong;
proxy_redirect off;
}

Once these steps are done from the console, in which we must be inside our vm we must perform the following request :
API_KEY=(your supabase service role key , found in the backend envs);
curl -X GET http://localhost:8000/auth/v1/settings \
-H ‘APIKey: ‘”$API_KEY”’’ \
-H ‘Authorization: Bearer ‘”$API_KEY”’’;
If the configuration is correct and you followed the steps, it should output: “saml_enabled”: true

Add auth0 as SAML identity provider:
-
In Auth0, go to Applications > Applications > Create application. Select “Single Page Web Applications” as application type. Then, click “Create”. (In case you have an application created this step can be skipped)
-
On the next page, select the “Settings” tab. Under “Allowed Callback URLs”, add the following URL depending on your implementation
- For local testing: http://localhost:8000/sso/saml/acs
- For production: https://yourdomain.com/sso/saml/acs

In allowed Callback URLs goes the link that directs to the environment database, and in allowed Web Origins is the port where supabase-auth is located , I recommend checking which port it runs on to configure it correctly with the command “sudo docker ps”.
- On the same page and in the same “Settings” tab, scroll down to “Advanced Settings” and click on “Endpoints”. Copy the “SAML Metadata URL” to the clipboard.

- In your terminal, execute the following command to add the SAML identity provider to Supabase:
API_KEY=(your supabase service role key);curl -X POST http://localhost:8000/
auth/v1/admin/sso/providers \ -H ‘APIKey: ‘”$API_KEY”’’ \ -H ‘Authorization:
Bearer ‘”$API_KEY”’’ \ -H ‘Content-Type: application/json’ \ -d ‘{ “type”: “saml”,
“metadata_url”: “(paste the SAML Metadata URL here)”, “domains”: [“yourdomain.
auth0.com”] }’;
In this part we must modify the domain with our auth0 application domain example of the dev environment domain: “domains”: [“daianadev.us.auth0.com”]

To verify if we correctly added our auth0 domain we must execute the following request
API_KEY=(your supabase service role key);curl -X GET http://localhost:8000/
auth/v1/admin/sso/providers \ -H ‘APIKey: ‘”$API_KEY”’’ \ -H ‘Authorization:
Bearer ‘”$API_KEY”’’

If the domains value is the one we put in the previous step, it is correctly configured. In case it is different you can use the following link to edit the Domain .
{host}/auth/v1/admin/sso/providers/{id}
POST {host}/auth/v1/admin/sso/providers/2a4a40ba-67a7-4827-930b-5712356a5e66
{
“domains”: [“somedomain.com”]
}
Final step :
After following the previous steps, your Supabase instance should support login via SSO. You can test it using the following API call:
curl -v -X POST http://localhost:7000/auth/v1/sso -H ‘APIKey: ‘”$API_KEY”’’ -H ‘Authorization:
Bearer ‘”$API_KEY”’’ -H ‘Content-Type: application/json’ -d ‘{“domain”: “daianadev.
us.auth0.com”, “skip_http_redirect”: true}’
it should respond with a URL with this structure

If the request sends this url, your SSO provider is correctly configured.
References:
-
Supabase GitHub Issue on enabling SAML https://github.com/supabase/cli/issues/1335
-
GoTrue API Documentation for managing SAML IdP https://github.com/subabase/gotrue/blob/master/openapi.yaml#L1441-L1608
-
Supabase Javascript Client https://supabase.com/docs/reference/javascript/auth-signinwithsso